mNo edit summary Tag: Visual edit |
mNo edit summary Tag: Source edit |
||
| (24 intermediate revisions by 5 users not shown) | |||
| Line 1: | Line 1: | ||
__NOEDITSECTION__ |
__NOEDITSECTION__ |
||
| + | <div style="background-color: #000000; border: 1px solid #808080; padding: 7px; width: 100px; text-align: center; float: left;">[[Hall of Heroes (SSE)|SSE Version]]</div> |
||
| − | [[File:HallOfHeroes.jpg|thumb|350px]] |
||
| + | <div style="background-color: #000000; border: 1px solid #808080; padding: 7px; width: 125px; position: relative; text-align: center; float: left;">[[Hall of Heroes (Classic Skyrim)|Classic Version]]</div> |
||
| − | The Hall of Heroes is a large room immediately in front of you when you enter the museum. It contains displays for many different items. It has two seperate floors. The lower gallery is listed on this page, see [[Upper Gallery]] for the displays on the second floor. To the left of the main Hall is the Culture and Arts Exhibit. This hallway has a door to the [[East Exhibit Halls]], the [[Library 1st Floor|Library]], as well as the [[Curator's Office]]. There's also a stairway leading to the [[Upper Gallery]] and the [[Armory]]. |
||
| + | <br><br> |
||
| − | To the right of the main hall are the [[Reception Hall and Staff Barracks]], which provide access to the [[Museum Storeroom]] and the [[Safehouse]]. |
||
| + | {{Location |
||
| + | |mod ={{Abb|LOTDSE}} |
||
| + | |Origin ={{Abb|LOTDSE}} |
||
| + | |title1 =Hall of Heroes |
||
| + | |image1 =HallOfHeroes.jpg |
||
| + | |Map =Hall of Heroes-localmap.jpg |
||
| + | |Location =[[Main Gallery]] |
||
| + | |Type =[[:Category:Gallery|Museum Gallery]] |
||
| + | |Sublocations = |
||
| + | [[Upper_Gallery_(SSE)|Upper Gallery]]<br> |
||
| + | [[Reception Hall and Staff Barracks (SSE)|Reception Hall and Staff Barracks]]<br> |
||
| + | [[Curator's Office (SSE)|Curator's Office]] |
||
| + | |Quest = |
||
| + | |Items = |
||
| + | |Special = |
||
| + | DBMDGHallofHeroes (standard Cell ID)<br> |
||
| + | DBMDGHallofHeroesHaunted<br> |
||
| + | :(during [[Night at the Museum]])<br> |
||
| + | DBMDGHallofHeroesHeist<br> |
||
| + | :(during [[Shadows of One's Past]]) |
||
| + | |Classic = |
||
| + | }} |
||
| + | The Hall of Heroes is a large room immediately in front of you when you enter the museum. It contains displays for many different items. It has two separate floors. The lower gallery is listed on this page, see [[Upper_Gallery_(SSE)|Upper Gallery]] for the displays on the second floor.<br> |
||
| + | To the left of the main Hall is the Culture and Arts Exhibit. This hallway has a door to the [[East Exhibit Halls]], the first floor of the [[Library 1st Floor (SSE)|Library]], as well as the [[Curator's Office (SSE)|Curator's Office]]. There's also a stairway leading to the [[Upper_Gallery_(SSE)|Upper Gallery]] and down to the [[Armory (SSE)|Armory]].<br> |
||
| + | To the right of the main hall are the [[Reception Hall and Staff Barracks (SSE)|Reception Hall and Staff Barracks]], which provide access to the [[Museum Storeroom (SSE)|Museum Storeroom]] and the [[The Safehouse|Safehouse]]. |
||
| + | If the {{NexusSSE|mod|31563|Official Creation Club Patch}} is installed, a new door to the [[Hall of Wonders]] will be added downstairs, next to the Armory. |
||
| − | {{Clrr}} |
||
==Entrance== |
==Entrance== |
||
| + | The entrance to the museum directly connects to the main Dragonborn Hall. On the left there is a bench, above that is a spot for a [[Paintings (SSE)|Painting]]. There is a cabinet with a chest for safe storage. On top of the cabinet is the Donations Box, as well as the [[Curator's Guide]]. On the wall is a plaque that shows the current museum display count. |
||
| − | [[File:Entrance Bench.jpg|thumb|350px]] |
||
| − | [[File:Entrance Right.jpg|thumb|350px]] |
||
| − | The entrance to the museum directly connects to the main Dragonborn Hall. On the left there is a bench, above that is a spot for a [[Paintings|Painting]]. There is a cabinet with a chest for safe storage. On top of the cabinet is the Donations Box, as well as the [[Curator's Guide]]. On the wall is a plaque that shows the current museum display count. |
||
| − | On the right is another spot for a [[Paintings|Painting]]. Below this is the "In Commemoration" display. This activates after you talked to Auryen after the [[Trial of Trinimac]] quest. It can be activated to watch the credit scene again. |
+ | On the right is another spot for a [[Paintings (SSE)|Painting]]. Below this is the "In Commemoration" display. This activates after you talked to Auryen after the [[Trial of Trinimac]] quest. It can be activated to watch the credit scene again. |
| + | <gallery widths=250 hideaddbutton=true captionalign=center spacing=small> |
||
| + | Entrance Bench.jpg |
||
| + | ScreenShot38.png |
||
| + | </gallery> |
||
| + | |||
| + | ==Statues== |
||
| + | On top of the fountain are three statues. |
||
| + | The Combat statue is unlocked by reaching level 100 in three out of five combat skills ({{Wiki|Archery_(Skyrim)|Archery}}, {{Wiki|Block_(Skyrim)|Block}}, {{Wiki|Heavy_Armor_(Skyrim)|Heavy Armor}}, {{Wiki|One-Handed_(Skyrim)|One-Handed}}, {{Wiki|Two-Handed_(Skyrim)|Two-Handed}}). |
||
| − | {{Clrr}} |
||
| + | The Stealth statue is unlocked by reaching level 100 in three out of five stealth skills ({{Wiki|Light_Armor_(Skyrim)|Light Armor}}, {{Wiki|Lockpicking_(Skyrim)|Lockpicking}}, {{Wiki|Pickpocket|Pickpocket}}, {{Wiki|Sneak_(Skyrim)|Sneak}}, {{Wiki|Speech|Speech}}). |
||
| − | ==Statues== |
||
| + | |||
| − | <gallery type="slideshow"> |
||
| + | The Magic statue is unlocked by reaching level 100 in three out of five magic skills ({{Wiki|Alteration_(Skyrim)|Alteration}}, {{Wiki|Conjuration_(Skyrim)|Conjuration}}, {{Wiki|Destruction_(Skyrim)|Destruction}}, {{Wiki|Illusion_(Skyrim)|Illusion}}, {{Wiki|Restoration_(Skyrim)|Restoration}}). |
||
| + | |||
| + | Behind the fountain is a statue holding a lantern on the left, this is called "Truth". On the right is a statue holding a book, this is called "Wisdom". |
||
| + | |||
| + | <gallery widths=250 position=center hideaddbutton=true captionalign=center spacing=small> |
||
HOHStatueSword.jpg|Combat Statue |
HOHStatueSword.jpg|Combat Statue |
||
HOHStatueMage.jpg|Mage Statue |
HOHStatueMage.jpg|Mage Statue |
||
| Line 22: | Line 57: | ||
StatueTruth.jpg|Truth Statue |
StatueTruth.jpg|Truth Statue |
||
StatueWisdom.jpg|Wisdom Statue |
StatueWisdom.jpg|Wisdom Statue |
||
| − | |hideaddbutton=true |
||
</gallery> |
</gallery> |
||
| − | |||
| − | On top of the fountain are three statues. |
||
| − | |||
| − | The Combat statue is unlocked by having three combat skills at level 100. ({{Wiki|Archery_(Skyrim)|Archery}}, {{Wiki|Block_(Skyrim)|Block}}, {{Wiki|Heavy_Armor_(Skyrim)|Heavy Armor}}, {{Wiki|One-Handed_(Skyrim)|One-Handed}}, {{Wiki|Two-Handed_(Skyrim)|Two-Handed}}. |
||
| − | |||
| − | The Stealth statue is unlocked by having three stealth skills at level 100. ({{Wiki|Light_Armor_(Skyrim)|Light Armor}}, {{Wiki|Lockpicking_(Skyrim)|Lockpicking}}, {{Wiki|Pickpocket|Pickpocket}}, {{Wiki|Sneak_(Skyrim)|Sneak}}, {{Wiki|Speech|Speech}}) |
||
| − | |||
| − | The Magic staute is unlocked by having three magic skills at level 100. ({{Wiki|Alteration_(Skyrim)|Alteration}}, {{Wiki|Conjuration_(Skyrim)|Conjuration}}, {{Wiki|Destruction_(Skyrim)|Destruction}}, {{Wiki|Illusion_(Skyrim)|Illusion}}, {{Wiki|Restoration_(Skyrim)|Restoration}}) |
||
| − | |||
| − | Behind the fountain is a statue holding a lantern on the left, this is called "Truth". On the right is a statue holding a book, this is called "Wisdom". |
||
| − | |||
| − | {{Clrr}} |
||
==Main Floor - Left Side== |
==Main Floor - Left Side== |
||
| − | {| class="article-table" style="width: |
+ | {| class="article-table" style="width: auto;" border="1" cellpadding="1" cellspacing="1" |
|- |
|- |
||
| − | ! scope="col" | |
+ | !colspan="3" scope="col" | |
===1st Weapons Display=== |
===1st Weapons Display=== |
||
|- |
|- |
||
| − | |[[File:HOHWeapons1.jpg|thumb| |
+ | |rowspan="4"|[[File:HOHWeapons1.jpg|thumb|center|350px]] |
| − | |- |
||
|[[Aegisbane]] |
|[[Aegisbane]] |
||
| − | |- |
||
|[[Chrysamere]] |
|[[Chrysamere]] |
||
|- |
|- |
||
|[[Ice Blade of the Monarch]] |
|[[Ice Blade of the Monarch]] |
||
| − | |- |
||
|[[Zephyr]] |
|[[Zephyr]] |
||
|- |
|- |
||
|[[Honorblade of Chorrol]] |
|[[Honorblade of Chorrol]] |
||
| − | |- |
||
|[[Reaper's Bane]] |
|[[Reaper's Bane]] |
||
|- |
|- |
||
| − | |[[Shadowhunt (Oblivion Artifact Pack)|Shadowhunt]] (requires {{abb|OAPSE}}) |
+ | |colspan="2"|[[Shadowhunt (Oblivion Artifact Pack)|Shadowhunt]] (requires {{abb|OAPSE}}) |
|} |
|} |
||
| − | {| class="article-table" style="width: |
+ | {| class="article-table" style="width: auto;" border="1" cellpadding="1" cellspacing="1" |
|- |
|- |
||
| − | ! scope="col" | |
+ | !colspan="3" scope="col" | |
| − | ===Relics of Ysgramor=== |
+ | ===Relics of Ysgramor Display=== |
| − | |- |
||
| − | |[[File:HOHYsgramor.jpg|thumb|400px]] |
||
|- |
|- |
||
| + | |rowspan="4"|[[File:HOHYsgramor.jpg|thumb|center|350px]] |
||
|[[Ysgramor's Armor]] |
|[[Ysgramor's Armor]] |
||
| − | |- |
||
|[[Ysgramor's Helmet]] |
|[[Ysgramor's Helmet]] |
||
|- |
|- |
||
|[[Ysgramor's Boots]] |
|[[Ysgramor's Boots]] |
||
| − | |- |
||
|[[Ysgramor's Gauntlets]] |
|[[Ysgramor's Gauntlets]] |
||
|- |
|- |
||
|[[Ysgramor's Cloak]] |
|[[Ysgramor's Cloak]] |
||
| − | |- |
||
|[[Shield of Ysgramor]] |
|[[Shield of Ysgramor]] |
||
|- |
|- |
||
| − | |[[Wuuthrad]] |
+ | |colspan="2"|[[Wuuthrad]] |
|} |
|} |
||
| − | {| class="article-table" style="width: |
+ | {| class="article-table" style="width: auto;" border="1" cellpadding="1" cellspacing="1" |
|- |
|- |
||
| − | ! scope="col" | |
+ | !colspan="3" scope="col" | |
===2nd Weapons Display=== |
===2nd Weapons Display=== |
||
|- |
|- |
||
| − | |[[File:HOHWeapons2.jpg|thumb| |
+ | |rowspan="4" style="vertical-align: top;"|[[File:HOHWeapons2.jpg|thumb|center|350px]] |
| − | |- |
||
|[[Firiniel's End]] |
|[[Firiniel's End]] |
||
| − | |- |
||
|[[Honed Ancient Nord Greatsword of Scorching]] |
|[[Honed Ancient Nord Greatsword of Scorching]] |
||
|- |
|- |
||
|[[Hrothmund's Axe]] |
|[[Hrothmund's Axe]] |
||
| − | |- |
||
|[[Steel Battleaxe of Fiery Souls]] |
|[[Steel Battleaxe of Fiery Souls]] |
||
|- |
|- |
||
| + | |[[Cyrus' Saber]] '''''or''''' [[Crimson Tide]] (requires {{NexusSSE|mod|31563|Creation Club Patch Hub}}) |
||
| − | |[[Cyrus' Saber]] |
||
| − | |- |
||
|[[Sixth House Bell Hammer]] |
|[[Sixth House Bell Hammer]] |
||
|- |
|- |
||
|[[Shadowsting]] (requires {{abb|IWSE}}) |
|[[Shadowsting]] (requires {{abb|IWSE}}) |
||
| − | |- |
||
|[[Battleaxe of Hatred]] (requires {{abb|OAPSE}}) |
|[[Battleaxe of Hatred]] (requires {{abb|OAPSE}}) |
||
|} |
|} |
||
| − | {| class="article-table" style="width: |
+ | {| class="article-table" style="width: auto;" border="1" cellpadding="1" cellspacing="1" |
|- |
|- |
||
| − | ! scope="col" | |
+ | !colspan="2" scope="col" | |
===3rd Weapons Display=== |
===3rd Weapons Display=== |
||
|- |
|- |
||
| − | |[[File:HOHWeapons3. |
+ | |rowspan=7 style="vertical-align: top;"|[[File:HOHWeapons3.png|thumb|center|250px]] |
| − | |- |
||
|[[Bipolar Blade]] |
|[[Bipolar Blade]] |
||
|- |
|- |
||
| Line 129: | Line 137: | ||
|} |
|} |
||
| − | {| class="article-table" style="width: |
+ | {| class="article-table" style="width: auto;" border="1" cellpadding="1" cellspacing="1" |
|- |
|- |
||
| − | ! scope="col" | |
+ | ! colspan="2" scope="col" | |
===Armor Display=== |
===Armor Display=== |
||
|- |
|- |
||
| − | |[[File:HOHArmor.jpg|thumb| |
+ | |colspan="2"|[[File:HOHArmor.jpg|thumb|500px|center]] |
|- |
|- |
||
| − | |[[Birthright of Astalon]] (requires {{abb|OAPSE}}) |
+ | |colspan="2"|[[Birthright of Astalon]] (requires {{abb|OAPSE}}) |
|- |
|- |
||
| − | |[[Aegis of the Apocalypse]] (requires {{abb|OAPSE}}) |
+ | |colspan="2"|[[Aegis of the Apocalypse]] (requires {{abb|OAPSE}}) |
|- |
|- |
||
|[[Bloodscythe]] |
|[[Bloodscythe]] |
||
| − | |- |
||
|[[Soulrender]] |
|[[Soulrender]] |
||
|- |
|- |
||
|[[Deathbrand Helm]] |
|[[Deathbrand Helm]] |
||
| − | |- |
||
|[[Deathbrand Armor]] |
|[[Deathbrand Armor]] |
||
|- |
|- |
||
|[[Deathbrand Gauntlets]] |
|[[Deathbrand Gauntlets]] |
||
| − | |- |
||
|[[Deathbrand Boots]] |
|[[Deathbrand Boots]] |
||
|- |
|- |
||
|[[Helmet of the Old Gods]] |
|[[Helmet of the Old Gods]] |
||
| − | |- |
||
|[[Armor of the Old Gods]] |
|[[Armor of the Old Gods]] |
||
|- |
|- |
||
| + | |[[Boots of the Old Gods]] |
||
|[[Gauntlets of the Old Gods]] |
|[[Gauntlets of the Old Gods]] |
||
| − | |- |
||
| − | |[[Boots of the Old Gods]] |
||
|- |
|- |
||
|[[Dragonmail Cuirass]] |
|[[Dragonmail Cuirass]] |
||
| − | |- |
||
|[[Lord's Mail]] |
|[[Lord's Mail]] |
||
|- |
|- |
||
| − | |[[Alvante's Armor]] (requires {{abb|OAPSE}}) |
+ | |[[Alvante's Armor]]<br />(requires {{abb|OAPSE}}) |
| + | |[[Alvante's Boots]]<br />(requires {{abb|OAPSE}}) |
||
|- |
|- |
||
| − | |[[Alvante's |
+ | |[[Alvante's Gloves]]<br />(requires {{abb|OAPSE}}) |
| + | |[[Alvante's Hood]]<br />(requires {{abb|OAPSE}}) |
||
|- |
|- |
||
| − | |[[ |
+ | |colspan="2"|[[Dondoran's Juggernaut]] (requires {{abb|OAPSE}}) |
| − | |- |
||
| − | |[[Alvante's Hood]] (requires {{abb|OAPSE}}) |
||
| − | |- |
||
| − | |[[Dondoran's Juggernaut]] (requires {{abb|OAPSE}}) |
||
|} |
|} |
||
| − | {| class="article-table" style="width: |
+ | {| class="article-table" style="width: auto;" border="1" cellpadding="1" cellspacing="1" |
|- |
|- |
||
| − | ! scope="col" | |
+ | !colspan="3" scope="col" | |
===4th Weapons Display=== |
===4th Weapons Display=== |
||
|- |
|- |
||
| − | |[[File:HOHWeapons4.jpg|thumb| |
+ | |rowspan="4" style="vertical-align: top;"|[[File:HOHWeapons4.jpg|thumb|center|350px]] |
| − | |- |
||
|[[Hopesfire]] |
|[[Hopesfire]] |
||
| − | |- |
||
|[[Trueflame]] |
|[[Trueflame]] |
||
|- |
|- |
||
|[[Harkon's Sword]] |
|[[Harkon's Sword]] |
||
| − | |- |
||
|[[Champion's Cudgel]] |
|[[Champion's Cudgel]] |
||
|- |
|- |
||
|[[Chillrend]] |
|[[Chillrend]] |
||
| − | |- |
||
|[[Trollsbane]] |
|[[Trollsbane]] |
||
|- |
|- |
||
| − | |[[Sinweaver]] (requires {{abb|OAPSE}}) |
+ | |colspan="2"|[[Sinweaver]] (requires {{abb|OAPSE}}) |
|} |
|} |
||
==Main Floor - Dragon Priest Masks and Claws Display== |
==Main Floor - Dragon Priest Masks and Claws Display== |
||
| − | {| class="article-table" style="width: |
+ | {| class="article-table" style="width: auto;" border="1" cellpadding="1" cellspacing="1" |
|- |
|- |
||
| − | ! scope="col" | |
+ | ! colspan="3" scope="col" | |
| − | ===Dragon Priest Masks and Claws=== |
+ | ===Dragon Priest Masks and Claws Display=== |
|- |
|- |
||
| − | |[[File:HOHMaskClaw.jpg|thumb| |
+ | |colspan="3"|[[File:HOHMaskClaw.jpg|thumb|600px|center]] |
|- |
|- |
||
| − | |[[Otar]] |
+ | |style="width: 33%"|[[Otar]] |
| + | |style="width: 33%"|[[Zahkriisos]] |
||
| + | |style="width: 33%"|[[Amethyst Claw, Left Half]] |
||
|- |
|- |
||
|[[Vokun]] |
|[[Vokun]] |
||
| + | |[[Haldriin]] |
||
| + | |[[Ivory Dragon Claw]] |
||
|- |
|- |
||
|[[Rahgot]] |
|[[Rahgot]] |
||
| + | |[[Ahzidal]] |
||
| + | |[[Ebony Dragon Claw]] |
||
|- |
|- |
||
|[[Volsung]] |
|[[Volsung]] |
||
| + | |[[Dukaan]] |
||
| + | |[[Coral Dragon Claw]] |
||
|- |
|- |
||
|[[Krosis]] |
|[[Krosis]] |
||
| + | |[[Wooden Mask]] |
||
| + | |[[Golden Claw]] |
||
|- |
|- |
||
|[[Morokei]] |
|[[Morokei]] |
||
| + | |[[Konahrik]] |
||
| + | |[[Jade Claw]] |
||
|- |
|- |
||
|[[Hevnoraak]] |
|[[Hevnoraak]] |
||
| + | |[[Miraak]] |
||
| + | |[[Glass Dragon Claw]] |
||
|- |
|- |
||
|[[Nahkriin]] |
|[[Nahkriin]] |
||
| + | |[[Emerald Dragon Claw]] |
||
| + | |[[Iron Dragon Claw]] |
||
|- |
|- |
||
|[[Korthor]] |
|[[Korthor]] |
||
| + | |[[Sapphire Dragon Claw]] |
||
| + | |[[Ruby Dragon Claw]] |
||
|- |
|- |
||
|[[Vahlok]] |
|[[Vahlok]] |
||
| + | |[[Diamond Dragon Claw]] |
||
| + | | |
||
|- |
|- |
||
|[[Vosis]] |
|[[Vosis]] |
||
| − | |- |
||
| − | |[[Zahkriisos]] |
||
| − | |- |
||
| − | |[[Haldriin]] |
||
| − | |- |
||
| − | |[[Ahzidal]] |
||
| − | |- |
||
| − | |[[Dukaan]] |
||
| − | |- |
||
| − | |[[Wooden Mask]] |
||
| − | |- |
||
| − | |[[Konahrik]] |
||
| − | |- |
||
| − | |[[Miraak]] |
||
| − | |- |
||
| − | |[[Emerald Dragon Claw]] |
||
| − | |- |
||
| − | |[[Sapphire Dragon Claw]] |
||
| − | |- |
||
| − | |[[Diamond Dragon Claw]] |
||
| − | |- |
||
|[[Amethyst Claw, Right Half]] |
|[[Amethyst Claw, Right Half]] |
||
| − | | |
+ | | |
| − | |[[Amethyst Claw, Left Half]] |
||
| − | |- |
||
| − | |[[Ivory Dragon Claw]] |
||
| − | |- |
||
| − | |[[Ebony Dragon Claw]] |
||
| − | |- |
||
| − | |[[Coral Dragon Claw]] |
||
| − | |- |
||
| − | |[[Golden Claw]] |
||
| − | |- |
||
| − | |[[Jade Claw]] |
||
| − | |- |
||
| − | |[[Glass Dragon Claw]] |
||
| − | |- |
||
| − | |[[Iron Dragon Claw]] |
||
| − | |- |
||
| − | |[[Ruby Dragon Claw]] |
||
|} |
|} |
||
==Main Floor - Right Side== |
==Main Floor - Right Side== |
||
| − | {| class="article-table" style="width: |
+ | {| class="article-table" style="width: auto;" border="1" cellpadding="1" cellspacing="1" |
|- |
|- |
||
| − | ! scope="col" | |
+ | !colspan="3" scope="col" | |
===5th Weapons Display=== |
===5th Weapons Display=== |
||
|- |
|- |
||
| − | |[[File:HOHWeapons5.jpg|thumb| |
+ | |rowspan="6" style="vertical-align: top;"|[[File:HOHWeapons5.jpg|thumb|center|350px]] |
| − | |- |
||
|[[The Pale Blade]] |
|[[The Pale Blade]] |
||
| − | |- |
||
|[[Bolar's Oathblade]] |
|[[Bolar's Oathblade]] |
||
|- |
|- |
||
|[[Froki's Bow]] |
|[[Froki's Bow]] |
||
| − | |- |
||
|[[The Longhammer]] |
|[[The Longhammer]] |
||
|- |
|- |
||
|[[Red Eagle's Bane]] |
|[[Red Eagle's Bane]] |
||
| − | |- |
||
|[[Windshear]] |
|[[Windshear]] |
||
|- |
|- |
||
| − | |[[Justice]] |
+ | |colspan="2"|[[Justice]]<br>(requires {{abb|IWSE}}) |
|- |
|- |
||
| − | |[[Redwave]] |
+ | |colspan="2"|[[Redwave]]<br>(requires {{abb|OAPSE}}) |
|- |
|- |
||
| − | |[[Captain Kordan's Saber]] |
+ | |colspan="2"|[[Captain Kordan's Saber]]<br>(requires {{abb|OAPSE}}) |
|} |
|} |
||
| − | {| class="article-table" style="width: |
+ | {| class="article-table" style="width: auto;" border="1" cellpadding="1" cellspacing="1" |
|- |
|- |
||
| − | ! scope="col" | |
+ | !colspan="2" scope="col" | |
===Crusader Relics Display=== |
===Crusader Relics Display=== |
||
|- |
|- |
||
| − | |[[File:HOHCrusader. |
+ | |rowspan="7" style="vertical-align: top;"|[[File:HOHCrusader.png|thumb|center|300px]] |
| − | |- |
||
|[[Sword of the Crusader]] |
|[[Sword of the Crusader]] |
||
|- |
|- |
||
| Line 319: | Line 292: | ||
|} |
|} |
||
| − | {| class="article-table" style="width: |
+ | {| class="article-table" style="width: auto;" border="1" cellpadding="1" cellspacing="1" |
|- |
|- |
||
| − | ! scope="col" | |
+ | !colspan="3" scope="col" | |
===6th Weapons Display=== |
===6th Weapons Display=== |
||
|- |
|- |
||
| − | |[[File:HOHWeapons6. |
+ | |rowspan="6" style="vertical-align: top;"|[[File:HOHWeapons6.png|thumb|center|300px]] |
| − | |- |
||
|[[Grimsever]] |
|[[Grimsever]] |
||
| − | |- |
||
|[[Cleaver of St. Felms]] |
|[[Cleaver of St. Felms]] |
||
|- |
|- |
||
|[[Thornblade]] |
|[[Thornblade]] |
||
| − | |- |
||
|[[Skullcrusher]] |
|[[Skullcrusher]] |
||
|- |
|- |
||
|[[Gravedigger]] |
|[[Gravedigger]] |
||
| − | |- |
||
|[[Stendarr's Hammer]] |
|[[Stendarr's Hammer]] |
||
|- |
|- |
||
| − | |[[Gron-Tosh's Fist]] |
+ | |colspan="2"|[[Gron-Tosh's Fist]]<br>(requires {{abb|IWSE}}) |
| + | |- |
||
| + | |colspan="2"|[[Targe of the Blooded]] |
||
|- |
|- |
||
| − | |[[Gildergreen Aegis]] |
+ | |colspan="2"|[[Gildergreen Aegis]]<br>(requires {{abb|IASE}}) |
|} |
|} |
||
| − | {| class="article-table" style="width: |
+ | {| class="article-table" style="width: auto;" border="1" cellpadding="1" cellspacing="1" |
|- |
|- |
||
| − | ! scope="col" | |
+ | !colspan="3" scope="col" | |
===7th Weapons Display=== |
===7th Weapons Display=== |
||
|- |
|- |
||
| − | |[[File:HOHWeapons7.jpg|thumb| |
+ | |rowspan="5" style="vertical-align: top;"|[[File:HOHWeapons7.jpg|thumb|center|350px]] |
| − | |- |
||
| − | |[[Targe of the Blooded]] |
||
| − | |- |
||
|[[Thrassian Plaguesword]] |
|[[Thrassian Plaguesword]] |
||
| − | |- |
||
|[[Briarheart Geis]] |
|[[Briarheart Geis]] |
||
|- |
|- |
||
|[[Bow of the Hunt]] |
|[[Bow of the Hunt]] |
||
| − | |- |
||
|[[Stormfang]] |
|[[Stormfang]] |
||
|- |
|- |
||
|[[Glass Bow of the Stag Prince]] |
|[[Glass Bow of the Stag Prince]] |
||
| − | |- |
||
|[[Horksbane]] |
|[[Horksbane]] |
||
|- |
|- |
||
| − | |[[Akaviri Sunderblade]] (requires {{abb|OAPSE}}) |
+ | |colspan="2"|[[Akaviri Sunderblade]] (requires {{abb|OAPSE}}) |
|- |
|- |
||
| − | |[[Blackwater Blade]] (requires {{abb|OAPSE}}) |
+ | |colspan="2"|[[Blackwater Blade]] (requires {{abb|OAPSE}}) |
|} |
|} |
||
| − | {| class="article-table" style="width: |
+ | {| class="article-table" style="width: auto;" border="1" cellpadding="1" cellspacing="1" |
|- |
|- |
||
| − | ! scope="col" | |
+ | ! colspan="3" scope="col" | |
===Ancient Nordic Display=== |
===Ancient Nordic Display=== |
||
|- |
|- |
||
| − | |[[File:HOHNordic. |
+ | |rowspan="6" style="vertical-align: top;"|[[File:HOHNordic.png|thumb|350px|center]] |
| − | |- |
||
|[[Ahzidal's Helm of Vision]] |
|[[Ahzidal's Helm of Vision]] |
||
| + | |[[Staff of Jyrik Gauldurson]] |
||
|- |
|- |
||
|[[Ahzidal's Armor of Retribution]] |
|[[Ahzidal's Armor of Retribution]] |
||
| + | |[[Gauldur Blackblade]] |
||
|- |
|- |
||
|[[Ahzidal's Gauntlets of Warding]] |
|[[Ahzidal's Gauntlets of Warding]] |
||
| + | |[[Gauldur Blackbow]] |
||
|- |
|- |
||
|[[Ahzidal's Boots of Waterwalking]] |
|[[Ahzidal's Boots of Waterwalking]] |
||
| + | |[[The Gauldur Amulet]] |
||
|- |
|- |
||
|[[Ahzidal's Ring of Arcana]] |
|[[Ahzidal's Ring of Arcana]] |
||
| + | |[[Enchanted Rings]] x3 |
||
|- |
|- |
||
|[[Ahzidal's Ring of Necromancy]] |
|[[Ahzidal's Ring of Necromancy]] |
||
| + | |[[Saarthal Amulet]] |
||
| + | |} |
||
| + | |||
| + | {| class="article-table" style="width: auto;" border="1" cellpadding="1" cellspacing="1" |
||
|- |
|- |
||
| + | !colspan="3" scope="col" | |
||
| − | |[[Staff of Jyrik Gauldurson]] |
||
| + | ===8th Weapons Display=== |
||
|- |
|- |
||
| + | |rowspan="6" style="vertical-align: top;"|[[File:HOHWeapons8.jpg|thumb|center|350px]] |
||
| − | |[[Gauldur Blackblade]] |
||
| + | |[[Dwarven Black Bow of Fate]] |
||
| + | |[[Okin]] |
||
|- |
|- |
||
| − | |[[ |
+ | |[[Eduj]] |
| + | |[[Herebane's Courage]] |
||
|- |
|- |
||
| − | |[[ |
+ | |[[Companion's Battle Axe]] |
| + | |[[Dawnfang/Duskfang]] '''''or''''' [[Bloodthirst]] (requires {{NexusSSE|mod|31563|Creation Club Patch Hub}}) |
||
|- |
|- |
||
| + | |colspan="2"|[[Herebane's Fortress]] |
||
| − | |[[Enchanted Rings]] x3 |
||
|- |
|- |
||
| + | |colspan="2"|[[Calliben's Grim Retort]]<br>(requires {{abb|OAPSE}}) |
||
| − | |[[Saarthal Amulet]] |
||
| + | |- |
||
| + | |colspan="2"|[[Rockshatter]]<br>(requires {{abb|OAPSE}}) |
||
|} |
|} |
||
| + | ==Main Floor - Pillar== |
||
| − | {| class="article-table" style="width: 400px;" border="1" cellpadding="1" cellspacing="1" |
||
| + | |||
| + | {| class="article-table" style="width: auto;" cellspacing="1" cellpadding="1" border="1" |
||
|- |
|- |
||
| − | ! scope="col" | |
+ | !colspan="2" scope="col" | |
| + | ==={{NexusSSE|mod|9320|Skyrim Sewers 4}} display=== |
||
| − | ===8th Weapons Display=== |
||
|- |
|- |
||
| − | |[[File: |
+ | |[[File:Sewers display 1.jpg|thumb|center|x300px]] |
| + | |[[File:Sewers display 2.jpg|thumb|center|x300px]] |
||
|- |
|- |
||
| − | |[[ |
+ | |[[Steel Dragon Claw]] |
| + | |[[Blade of the Rourken]] |
||
|- |
|- |
||
| − | |[[ |
+ | |[[Mournbringer]] |
| + | |[[Shardslayer]] |
||
|- |
|- |
||
| + | |[[Honorblade of Whiterun]] |
||
| − | |[[Eduj]] |
||
| + | | |
||
| + | |} |
||
| + | |||
| + | ==Wintersun Display== |
||
| + | |||
| + | {| class="article-table" style="width: auto;" cellspacing="1" cellpadding="1" border="1" |
||
|- |
|- |
||
| + | ! colspan="3" scope="col" | |
||
| − | |[[Herebane's Courage]] |
||
| + | ===Wintersun Display=== |
||
|- |
|- |
||
| + | | colspan="3" |[[File:Wintersun Display.png|thumb|600px|center]] (requires {{Abb|WSN}}) |
||
| − | |[[Companion's Battle Axe]] |
||
| + | |- |
||
| + | | style="width: 33%" |[[Shrine of the Hist]] |
||
| + | | style="width: 33%" |[[Shrine of Jyggalag]] |
||
| + | | style="width: 33%" |[[Lantern of the Ancestors]] |
||
| + | |- |
||
| + | |[[Shrine of Ebonarm]] |
||
| + | |[[Shrine to Clavicus Vile]] |
||
| + | |[[Shrine of Magnus]] |
||
| + | |- |
||
| + | |[[Shrine of the All-Maker]] |
||
| + | |[[Ebony Raven]] |
||
| + | |[[Shrine of Syrabane]] |
||
| + | |- |
||
| + | |[[Goblet of Infinite Grace]] |
||
| + | |[[Shrine of Hermaeus Mora]] |
||
| + | |[[Shrine of Phynaster]] |
||
| + | |- |
||
| + | |[[Shrine of the Old Ways]] |
||
| + | |[[Statue to Meridia]] |
||
| + | |[[Shrine of Trinimac]] |
||
| + | |- |
||
| + | |[[Shrine of the Magna-Ge]] |
||
| + | |[[Shrine of Malacath]] |
||
| + | |[[Shrine of Xarxes]] |
||
| + | |- |
||
| + | |[[Shrine of Sithis]] |
||
| + | |[[Shrine of Vaermina]] |
||
| + | |[[Shrine of Jephre]] |
||
| + | |- |
||
| + | |[[Shrine of St. Alessia]] |
||
| + | |[[Shrine of Sanguine]] |
||
| + | |[[Stone of the Forebears]] |
||
| + | |- |
||
| + | |[[Shrine of Mannimarco]] |
||
| + | |[[Tempus Dominus]] |
||
| + | |[[Shrine of Leki]] |
||
| + | |- |
||
| + | |[[Shrine of Shor]] |
||
| + | |[[Shrine of Mehrunes Dagon]] |
||
| + | |[[Shrine of Morwha]] |
||
| + | |- |
||
| + | |[[Shrine of Hircine]] |
||
| + | |[[Shrine of Nocturnal]] |
||
| + | |[[Shrine of Satakal]] |
||
|- |
|- |
||
| − | |[[ |
+ | |[[Shrine of Namira]] |
| + | |[[Shrine of Riddle'Thar]] |
||
| + | |[[Shrine of Tall Papa]] |
||
|- |
|- |
||
| − | |[[ |
+ | |[[Shrine of Molag Bal]] |
| + | |[[Shrine of Rajhin]] |
||
| + | |[[Shrine of the HoonDing]] |
||
|- |
|- |
||
| + | |[[Shrine of Sheogorath]] |
||
| − | |[[Calliben's Grim Retort]] (requires {{abb|OAPSE}}) |
||
| + | |[[Shrine of Baan Dar]] |
||
| + | | |
||
|- |
|- |
||
| + | |[[Shrine of Peryite]] |
||
| − | |[[Rockshatter]] (requires {{abb|OAPSE}}) |
||
| + | |[[Shrine of Z'en]] |
||
| + | | |
||
|} |
|} |
||
| Line 434: | Line 478: | ||
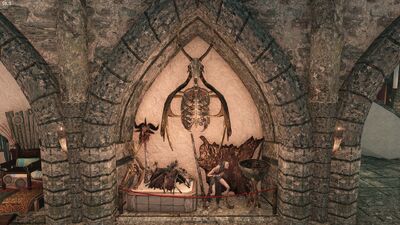
===Giants=== |
===Giants=== |
||
| − | *Giants of Sleeping Tree Camp |
+ | *Giants of {{wiki|Sleeping_Tree_Camp|Sleeping Tree Camp}} |
| − | *Giants of Cradlecrush Rock |
+ | *Giants of {{wiki|Cradlecrush_Rock|Cradlecrush Rock}} |
| − | *Giants of Talking Stone Camp |
+ | *Giants of {{wiki|Talking_Stone_Camp|Talking Stone Camp}} |
| − | *Giants of Blizzard Rest |
+ | *Giants of {{wiki|Blizzard_Rest|Blizzard Rest}} |
| − | *Giants of Stonehill Bluff |
+ | *Giants of {{wiki|Stonehill_Bluff|Stonehill Bluff}} |
| − | *Giants of Guldun Rock |
+ | *Giants of {{wiki|Guldun_Rock|Guldun Rock}} |
| − | *Giants of Bleakwind Basin |
+ | *Giants of {{wiki|Bleakwind_Basin|Bleakwind Basin}} |
===Forsworn=== |
===Forsworn=== |
||
| − | *Forsworn of Hag Rock Redoubt |
+ | *Forsworn of {{wiki|Hag_Rock_Redoubt|Hag Rock Redoubt}} |
| − | *Forsworn of Lost Valley Redoubt |
+ | *Forsworn of {{wiki|Lost_Valley_Redoubt|Lost Valley Redoubt}} |
| − | *Forsworn of Karthspire Camp |
+ | *Forsworn of {{wiki|Karthspire_Camp|Karthspire Camp}} |
| − | *The Witches of Glenmoril Coven |
+ | *The Witches of {{wiki|Glenmoril_Coven_(Skyrim)|Glenmoril Coven}} |
===Rieklings=== |
===Rieklings=== |
||
| − | *Rieklings of Moesring Pass |
+ | *Rieklings of {{wiki|Moesring_Pass|Moesring Pass}} |
| − | *Rieklings of Thirsk Mead Hall |
+ | *Rieklings of {{wiki|Thirsk_Mead_Hall_(Dragonborn)|Thirsk Mead Hall}} |
| − | *Rieklings of Northern Solstheim |
+ | *Rieklings of {{wiki|Riekling_Island|Northern Solstheim}} |
| − | *Rieklings of Frossel |
+ | *Rieklings of {{wiki|Frossel_(Dragonborn)|Frossel}} |
| − | *Rieklings of Karstaag Ruins |
+ | *Rieklings of {{wiki|Castle_Karstaag_Ruins|Karstaag Ruins}} |
| − | *Rieklings of Bristleback Cave |
+ | *Rieklings of {{wiki|Bristleback_Cave|Bristleback Cave}} |
| − | *Rieklings of Glacial Cave |
+ | *Rieklings of {{wiki|Glacial_Cave|Glacial Cave}} |
| − | *Rieklings of Benkongerike |
+ | *Rieklings of {{wiki|Benkongerike_(Dragonborn)|Benkongerike}} |
===Falmer=== |
===Falmer=== |
||
| − | *Falmer of Frostflow Lighthouse |
+ | *Falmer of {{wiki|Frostflow_Lighthouse|Frostflow Lighthouse}} |
| − | *Falmer of Sightless Pit |
+ | *Falmer of {{wiki|Sightless_Pit|Sightless Pit}} |
| − | *Falmer of Chillwind Depths |
+ | *Falmer of {{wiki|Chillwind_Depths_(Skyrim)|Chillwind Depths}} |
| − | *Falmer of Duskglow Crevice |
+ | *Falmer of {{wiki|Duskglow_Crevice|Duskglow Crevice}} |
| − | *Falmer of Gloomreach |
+ | *Falmer of {{wiki|Gloomreach|Gloomreach}} |
| − | *Falmer of Lost Echo Cave |
+ | *Falmer of {{wiki|Lost_Echo_Cave|Lost Echo Cave}} |
| − | *Falmer of Darkwater Cavern |
+ | *Falmer of {{wiki|Darkwater_Pass|Darkwater Cavern}} |
| − | *Falmer of Stillborn Cave |
+ | *Falmer of {{wiki|Stillborn_Cave|Stillborn Cave}} |
| − | *Falmer of Liar's Retreat |
+ | *Falmer of {{wiki|Liar's_Retreat|Liar's Retreat}} |
| − | *Falmer of Shimmermist Cave |
+ | *Falmer of {{wiki|Shimmermist_Cave|Shimmermist Cave}} |
| + | {{Navbox gallery SSE}} |
||
[[Category:Gallery]] |
[[Category:Gallery]] |
||
Revision as of 11:43, 18 July 2021
The Hall of Heroes is a large room immediately in front of you when you enter the museum. It contains displays for many different items. It has two separate floors. The lower gallery is listed on this page, see Upper Gallery for the displays on the second floor.
To the left of the main Hall is the Culture and Arts Exhibit. This hallway has a door to the East Exhibit Halls, the first floor of the Library, as well as the Curator's Office. There's also a stairway leading to the Upper Gallery and down to the Armory.
To the right of the main hall are the Reception Hall and Staff Barracks, which provide access to the Museum Storeroom and the Safehouse.
If the Official Creation Club Patch is installed, a new door to the Hall of Wonders will be added downstairs, next to the Armory.
Entrance
The entrance to the museum directly connects to the main Dragonborn Hall. On the left there is a bench, above that is a spot for a Painting. There is a cabinet with a chest for safe storage. On top of the cabinet is the Donations Box, as well as the Curator's Guide. On the wall is a plaque that shows the current museum display count.
On the right is another spot for a Painting. Below this is the "In Commemoration" display. This activates after you talked to Auryen after the Trial of Trinimac quest. It can be activated to watch the credit scene again.
")
")
Statues
On top of the fountain are three statues.
The Combat statue is unlocked by reaching level 100 in three out of five combat skills (Archery, Block, Heavy Armor, One-Handed, Two-Handed).
The Stealth statue is unlocked by reaching level 100 in three out of five stealth skills (Light Armor, Lockpicking, Pickpocket, Sneak, Speech).
The Magic statue is unlocked by reaching level 100 in three out of five magic skills (Alteration, Conjuration, Destruction, Illusion, Restoration).
Behind the fountain is a statue holding a lantern on the left, this is called "Truth". On the right is a statue holding a book, this is called "Wisdom".
")
")
")
")
")
Main Floor - Left Side
1st Weapons Display | ||
|---|---|---|
| Aegisbane | Chrysamere | |
| Ice Blade of the Monarch | Zephyr | |
| Honorblade of Chorrol | Reaper's Bane | |
| Shadowhunt (requires Oblivion Artifact Pack) | ||

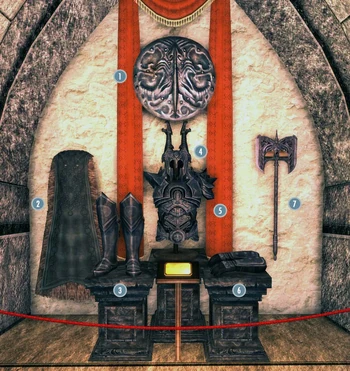
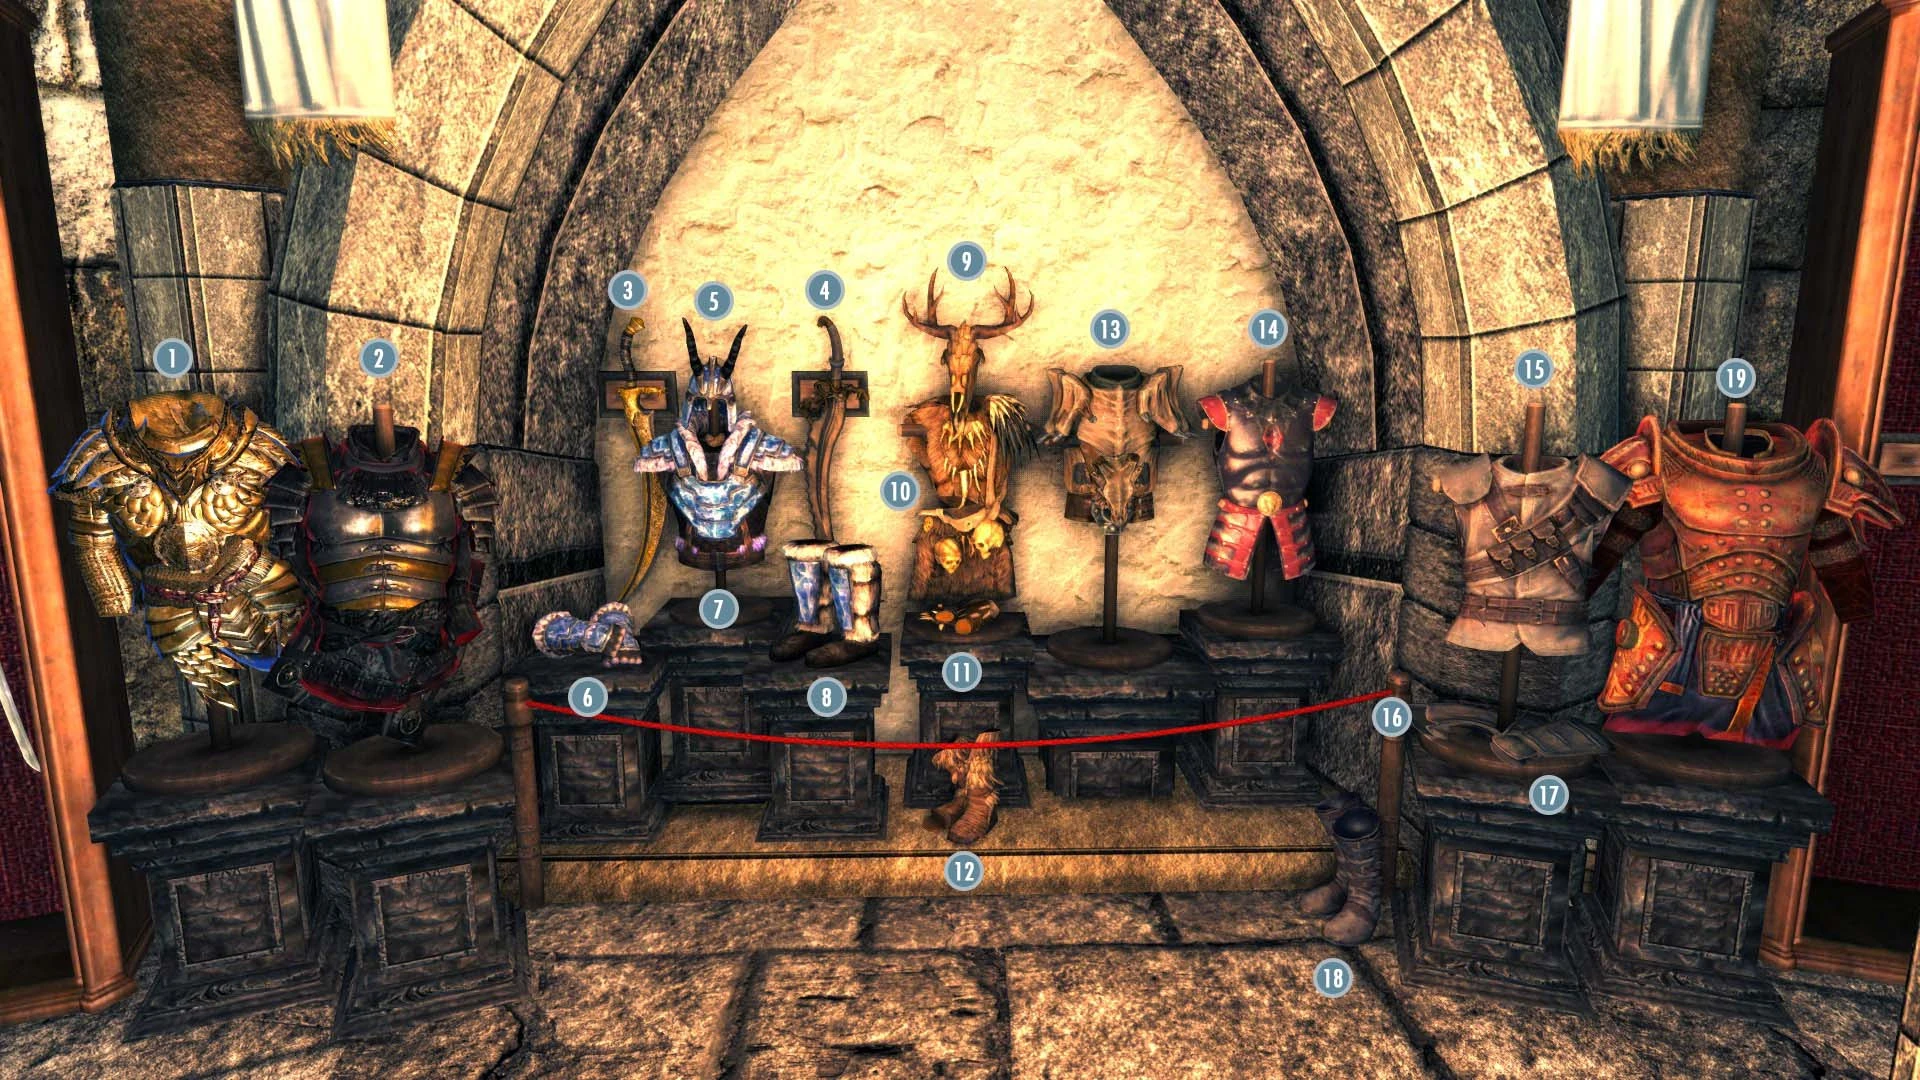
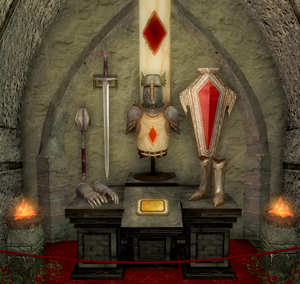
Relics of Ysgramor Display | ||
|---|---|---|
| Ysgramor's Armor | Ysgramor's Helmet | |
| Ysgramor's Boots | Ysgramor's Gauntlets | |
| Ysgramor's Cloak | Shield of Ysgramor | |
| Wuuthrad | ||

2nd Weapons Display | ||
|---|---|---|
| Firiniel's End | Honed Ancient Nord Greatsword of Scorching | |
| Hrothmund's Axe | Steel Battleaxe of Fiery Souls | |
| Cyrus' Saber or Crimson Tide (requires Creation Club Patch Hub) | Sixth House Bell Hammer | |
| Shadowsting (requires Immersive Weapons) | Battleaxe of Hatred (requires Oblivion Artifact Pack) | |

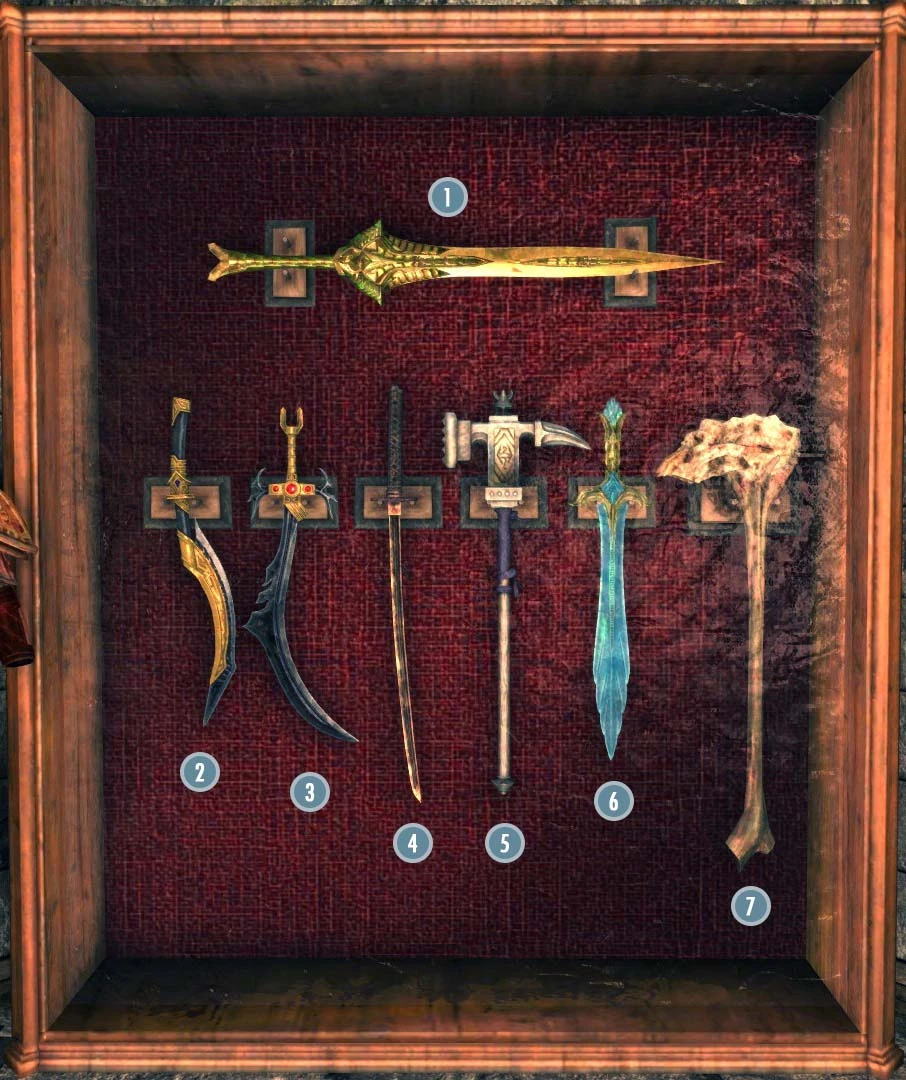
3rd Weapons Display | |
|---|---|
| Bipolar Blade | |
| Debaser | |
| Mace of Aevar Stone-Singer | |
| Ghostblade | |
| Bloodskal Blade | |
| Dragonbane | |
| Eleidon's Ward | |


4th Weapons Display | ||
|---|---|---|
| Hopesfire | Trueflame | |
| Harkon's Sword | Champion's Cudgel | |
| Chillrend | Trollsbane | |
| Sinweaver (requires Oblivion Artifact Pack) | ||

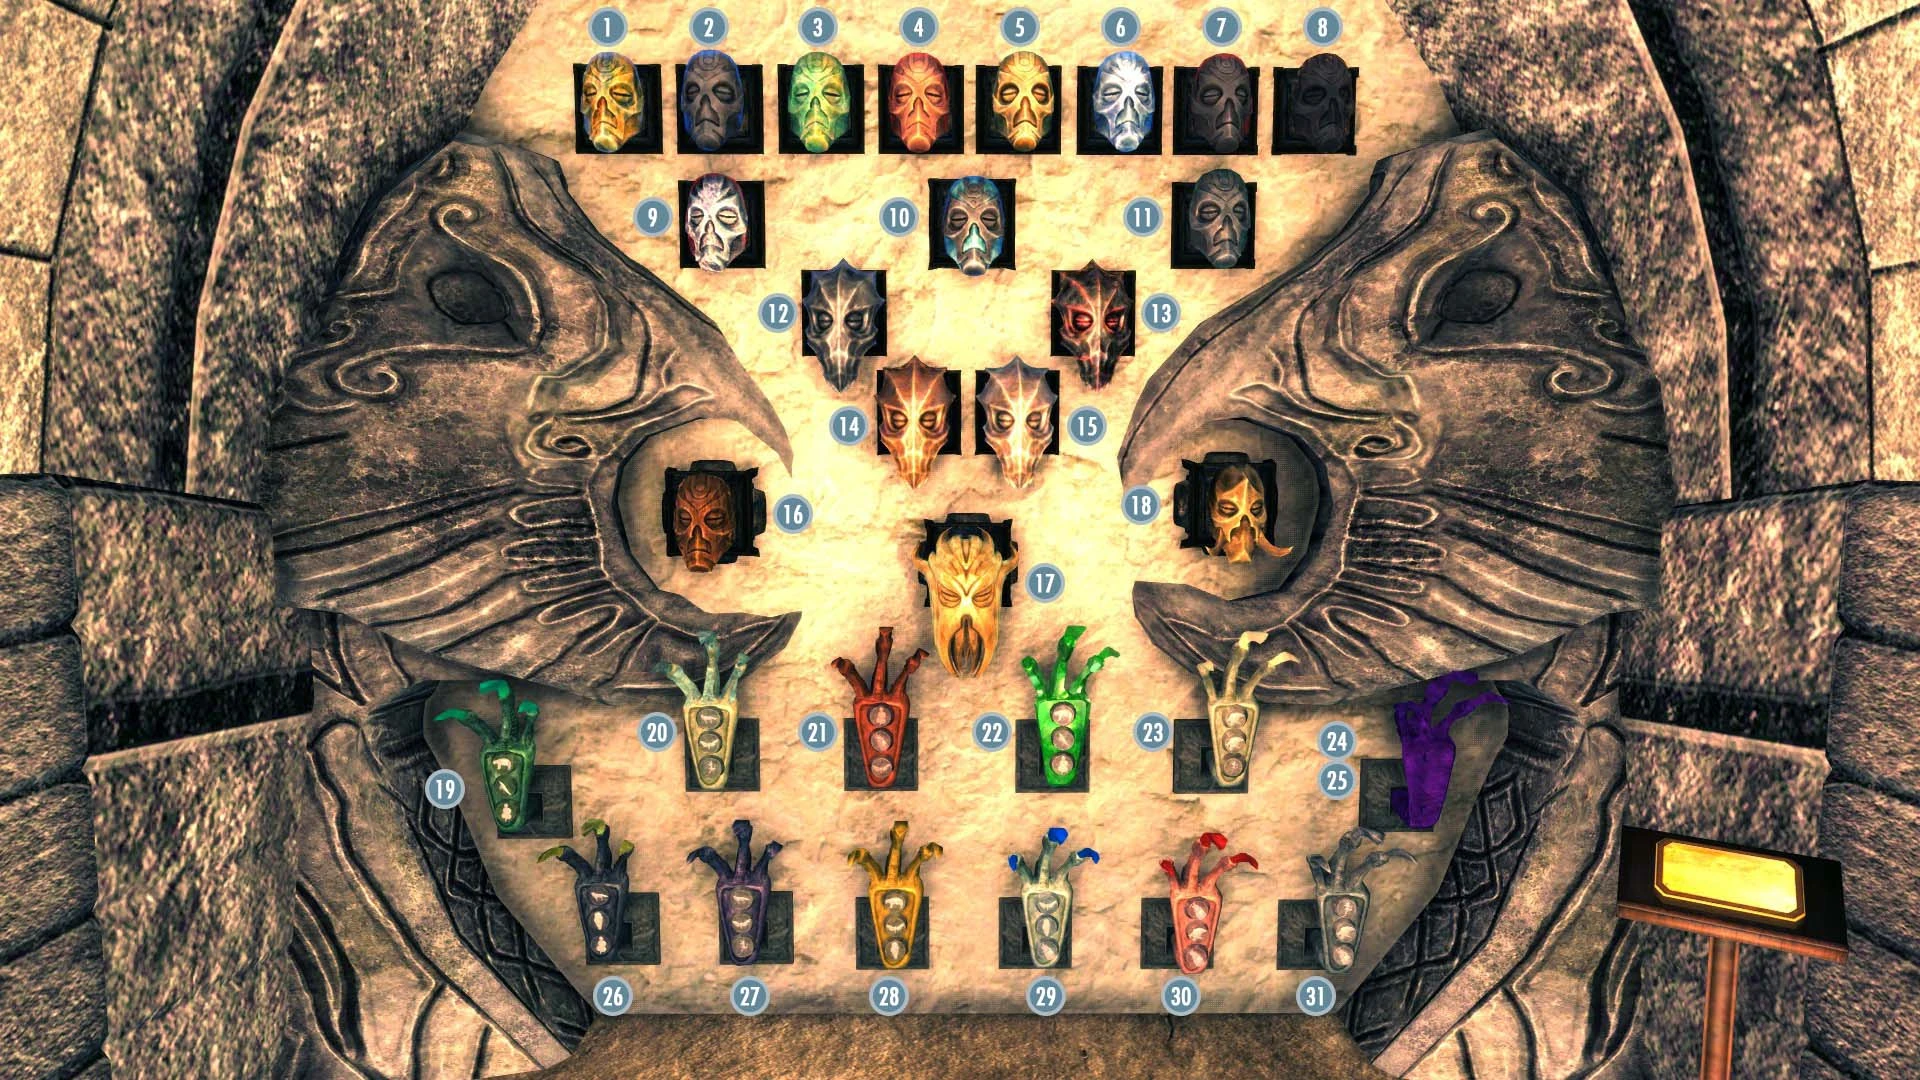
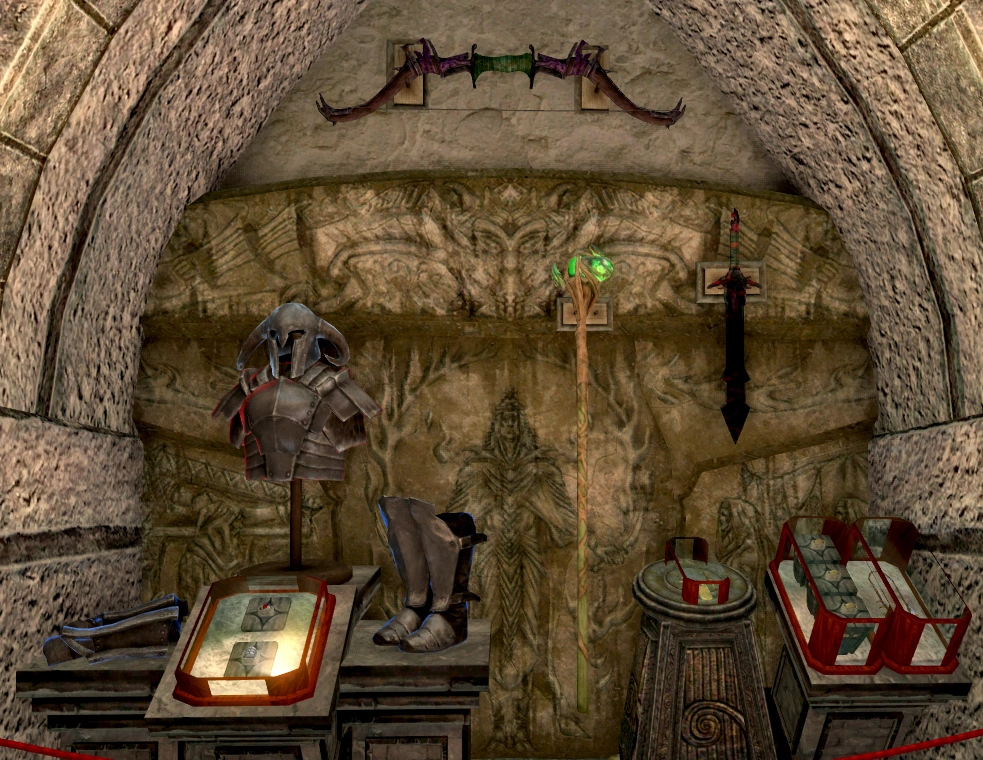
Main Floor - Dragon Priest Masks and Claws Display
Main Floor - Right Side
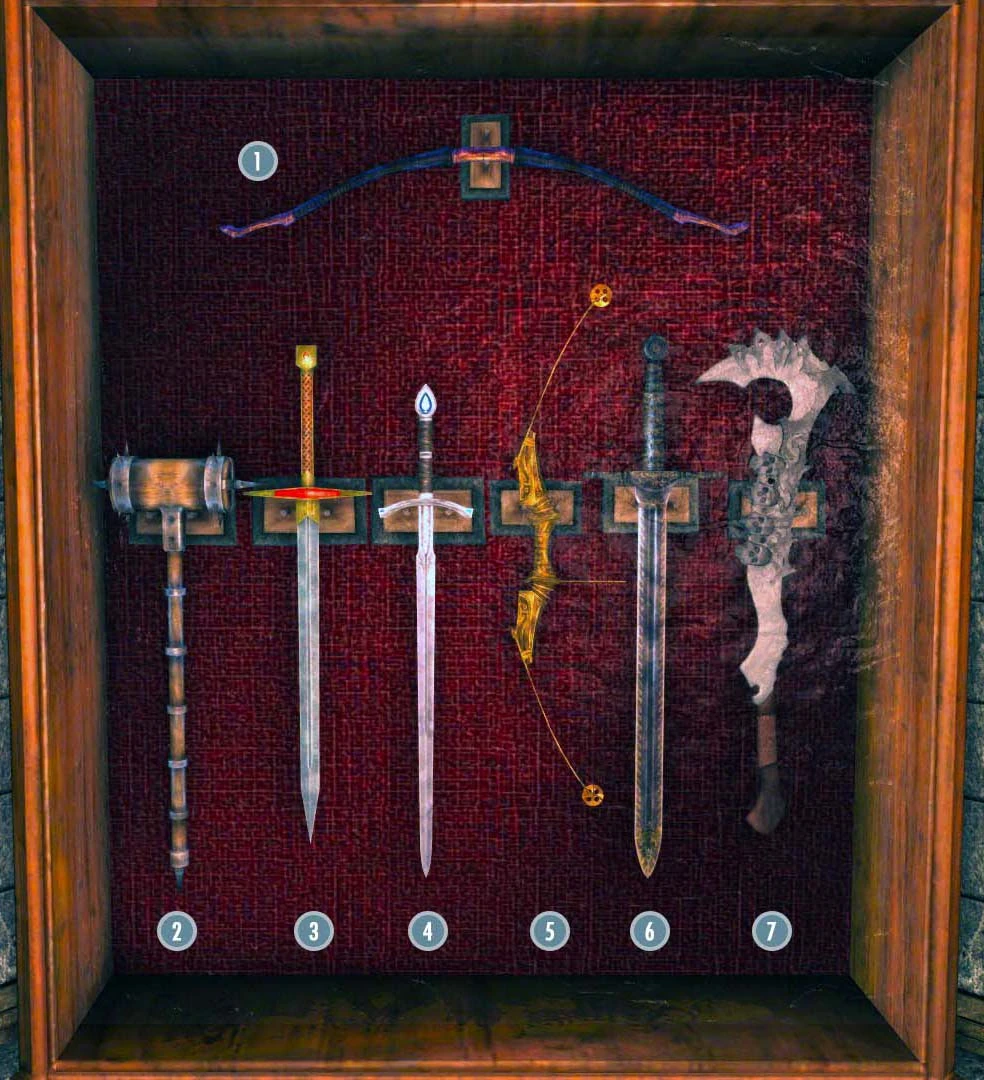
5th Weapons Display | ||
|---|---|---|
| The Pale Blade | Bolar's Oathblade | |
| Froki's Bow | The Longhammer | |
| Red Eagle's Bane | Windshear | |
| Justice (requires Immersive Weapons) | ||
| Redwave (requires Oblivion Artifact Pack) | ||
| Captain Kordan's Saber (requires Oblivion Artifact Pack) | ||
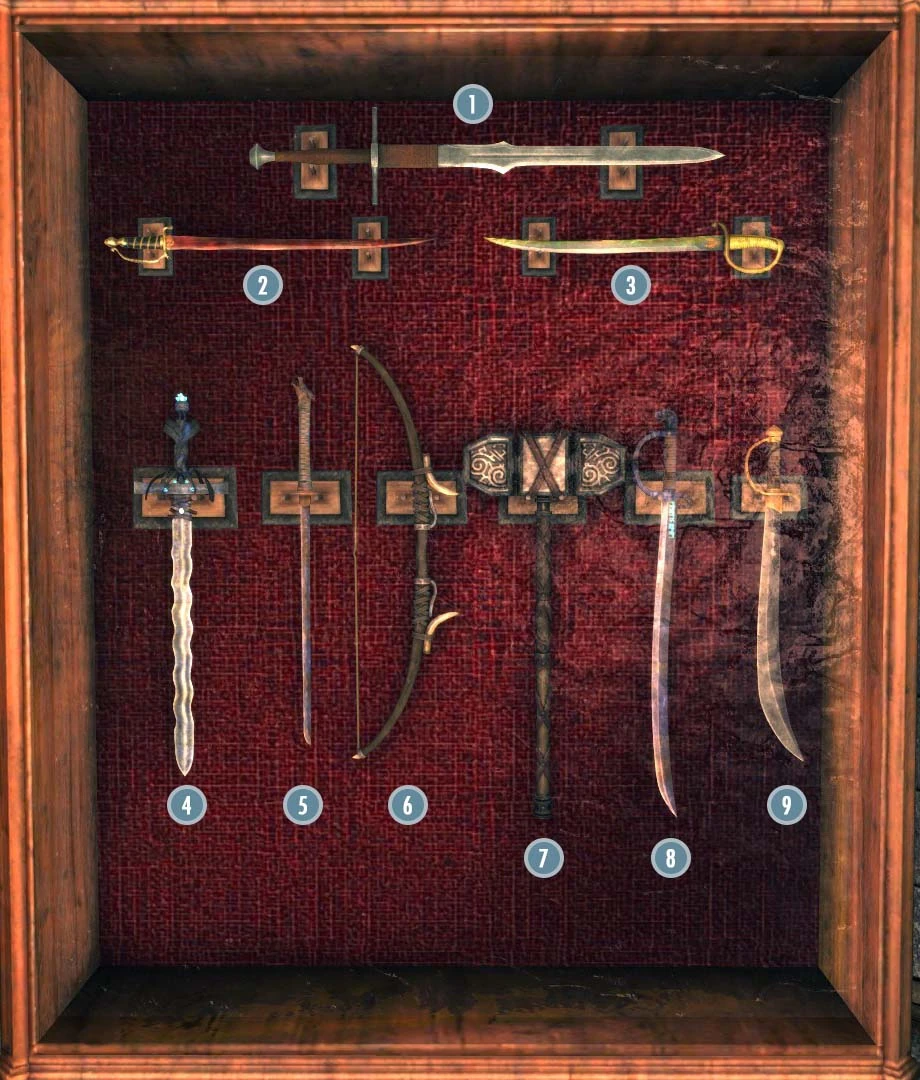

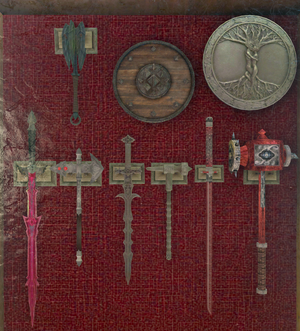
Crusader Relics Display | |
|---|---|
| Sword of the Crusader | |
| Mace of the Crusader | |
| Helm of the Crusader | |
| Armor of the Crusader | |
| Gauntlets of the Crusader | |
| Boots of the Crusader | |
| Shield of the Crusader | |

6th Weapons Display | ||
|---|---|---|
| Grimsever | Cleaver of St. Felms | |
| Thornblade | Skullcrusher | |
| Gravedigger | Stendarr's Hammer | |
| Gron-Tosh's Fist (requires Immersive Weapons) | ||
| Targe of the Blooded | ||
| Gildergreen Aegis (requires Immersive Armors) | ||

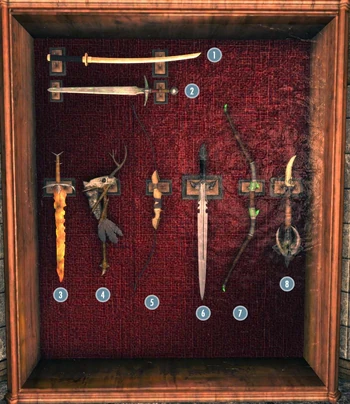
7th Weapons Display | ||
|---|---|---|
| Thrassian Plaguesword | Briarheart Geis | |
| Bow of the Hunt | Stormfang | |
| Glass Bow of the Stag Prince | Horksbane | |
| Akaviri Sunderblade (requires Oblivion Artifact Pack) | ||
| Blackwater Blade (requires Oblivion Artifact Pack) | ||


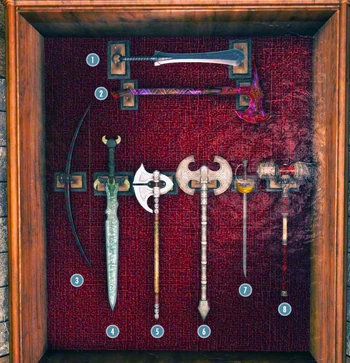
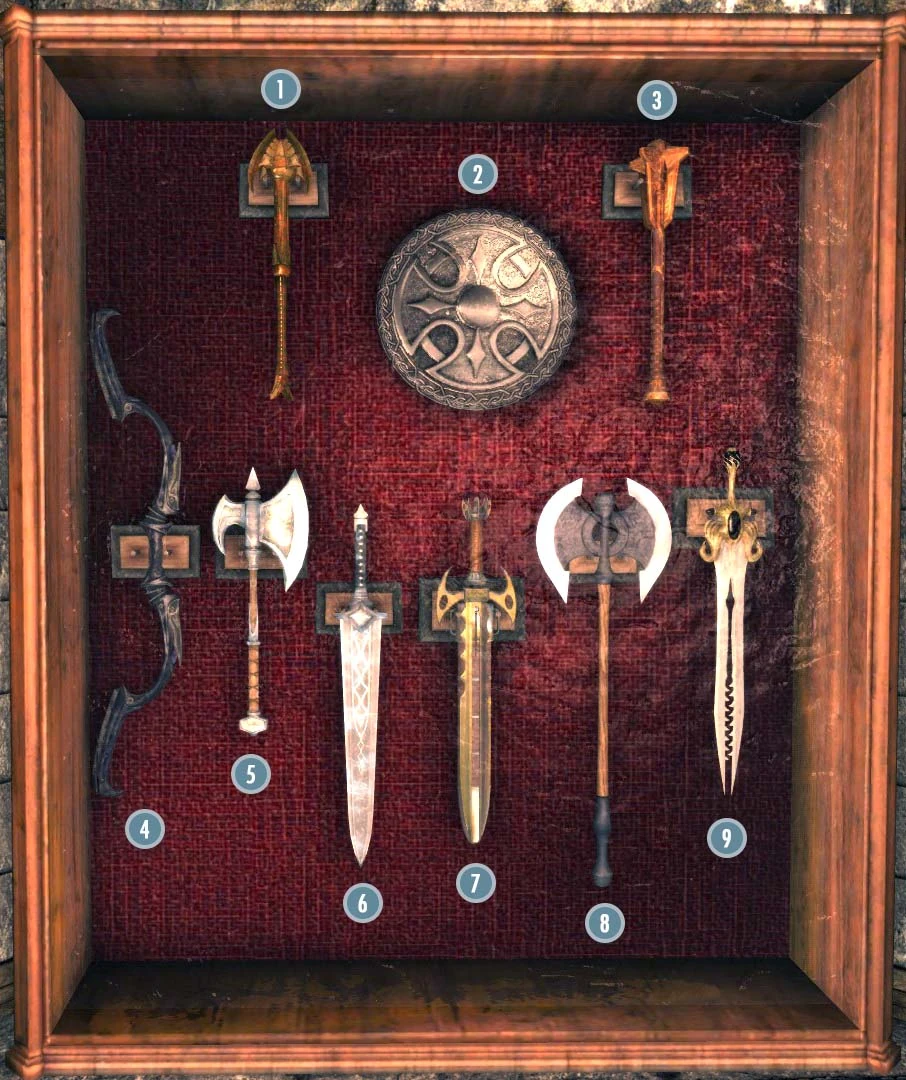
8th Weapons Display | ||
|---|---|---|
| Dwarven Black Bow of Fate | Okin | |
| Eduj | Herebane's Courage | |
| Companion's Battle Axe | Dawnfang/Duskfang or Bloodthirst (requires Creation Club Patch Hub) | |
| Herebane's Fortress | ||
| Calliben's Grim Retort (requires Oblivion Artifact Pack) | ||
| Rockshatter (requires Oblivion Artifact Pack) | ||

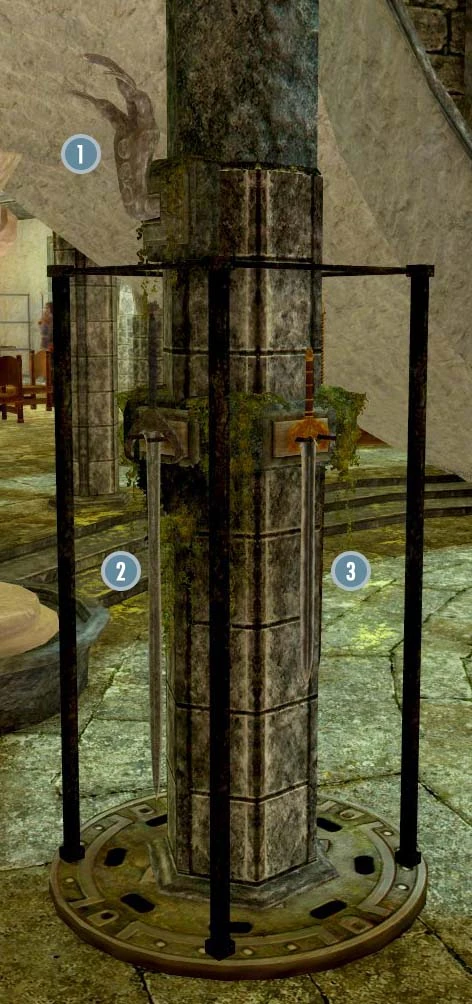
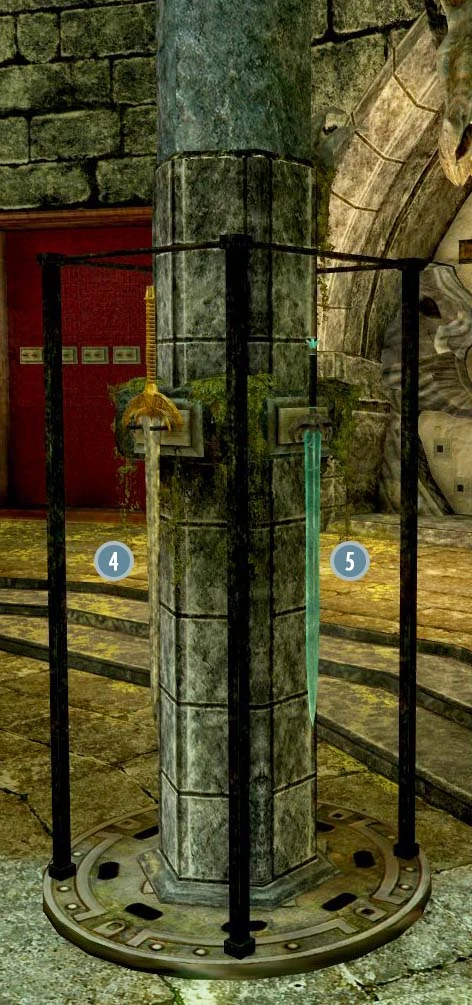
Main Floor - Pillar
Skyrim Sewers 4 display | |
|---|---|
| Steel Dragon Claw | Blade of the Rourken |
| Mournbringer | Shardslayer |
| Honorblade of Whiterun | |


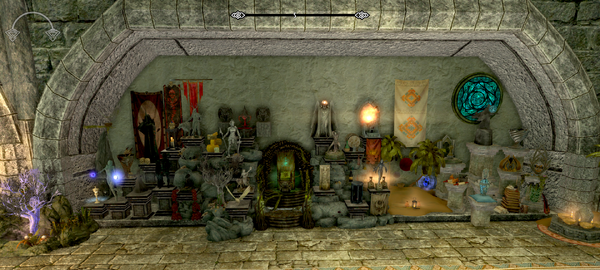
Wintersun Display

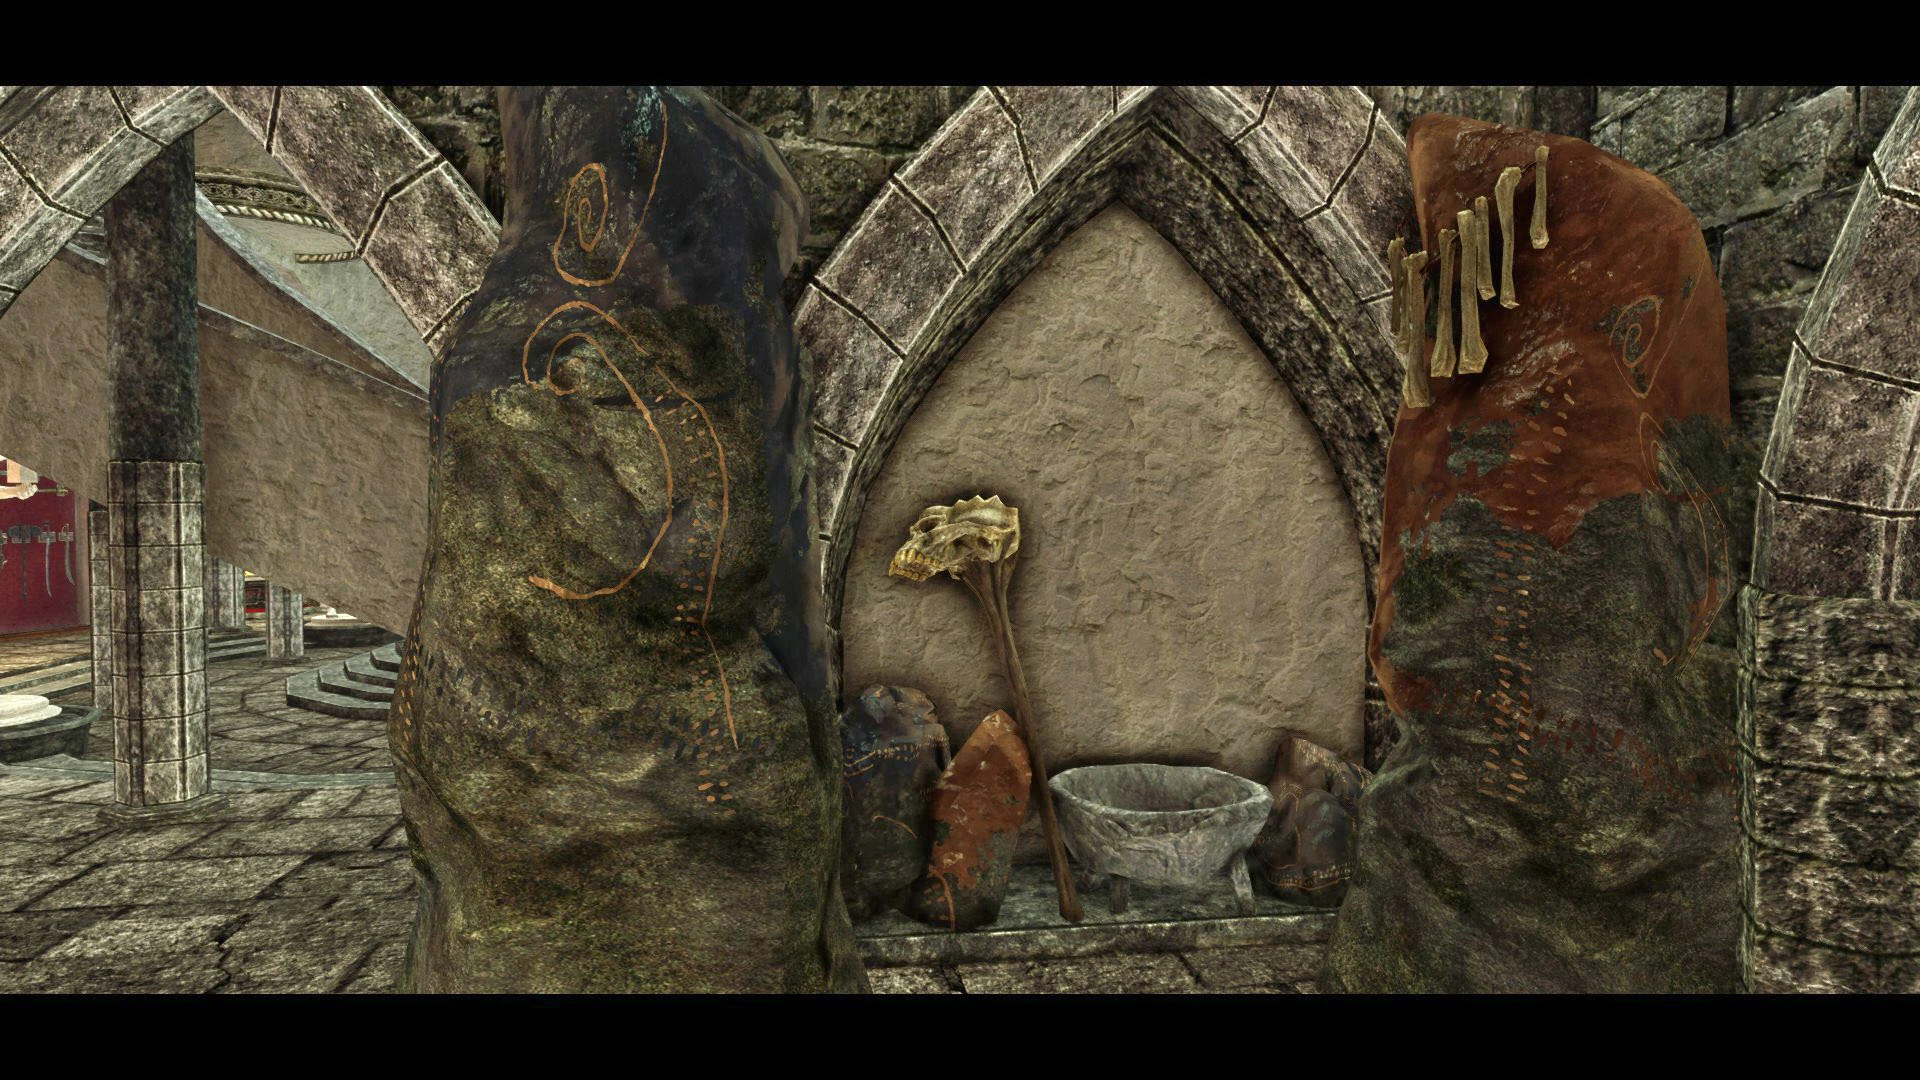
Culture and Arts Section


Giants
- Giants of Sleeping Tree Camp
- Giants of Cradlecrush Rock
- Giants of Talking Stone Camp
- Giants of Blizzard Rest
- Giants of Stonehill Bluff
- Giants of Guldun Rock
- Giants of Bleakwind Basin
Forsworn
- Forsworn of Hag Rock Redoubt
- Forsworn of Lost Valley Redoubt
- Forsworn of Karthspire Camp
- The Witches of Glenmoril Coven
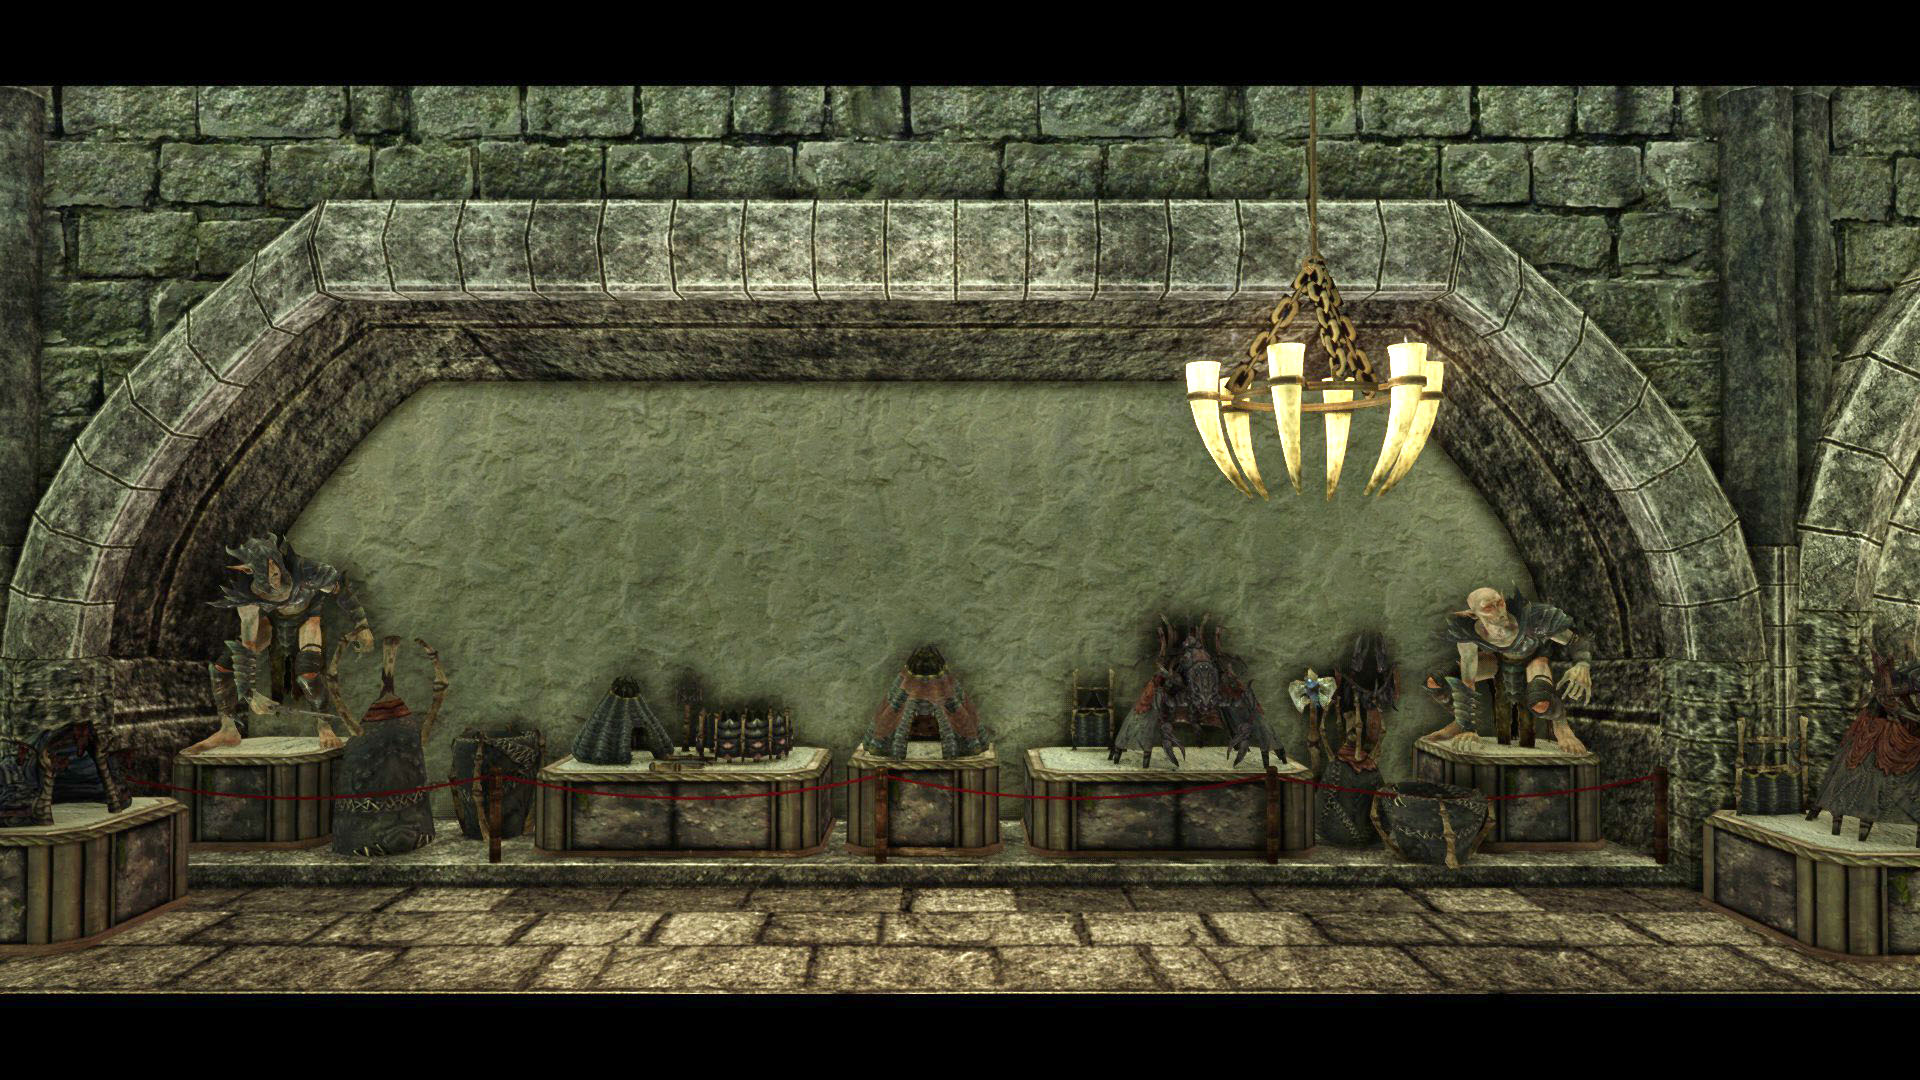
Rieklings
- Rieklings of Moesring Pass
- Rieklings of Thirsk Mead Hall
- Rieklings of Northern Solstheim
- Rieklings of Frossel
- Rieklings of Karstaag Ruins
- Rieklings of Bristleback Cave
- Rieklings of Glacial Cave
- Rieklings of Benkongerike
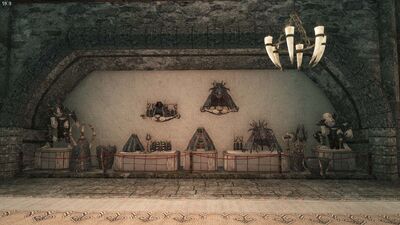
Falmer
- Falmer of Frostflow Lighthouse
- Falmer of Sightless Pit
- Falmer of Chillwind Depths
- Falmer of Duskglow Crevice
- Falmer of Gloomreach
- Falmer of Lost Echo Cave
- Falmer of Darkwater Cavern
- Falmer of Stillborn Cave
- Falmer of Liar's Retreat
- Falmer of Shimmermist Cave